Showing posts with label Ditsy Floral Dress. Show all posts

Sunday, 16 October 2011

Downton Abbey Costumes at Creative Stitches 2011

These are not the best quality photos so I apologise now, if Kylie gets round to posting hers on fb then I will steal them as I am pretty sure her phone camera was better than mine.  I do have a new phone now though so maybe the pictures from now on will be better, I am going to try it out today when I visit some tea rooms on the marina :)

A selection of costumes were at the Creative Stitches show I went to in Cardiff, I don't have the info about them but if you watch the show then I am sure you will recognise them.
Cotton and lace day dress
Purple and black houndstooth
This was an original Victorian dress that had been adapted for the series
Scandalous Pantaloon dress
Maroon evening dress
Close up of bodice
Lovely gold lace overlay
Flower shoe coat and dress
I wish we could have got a little closer to see all the details.

Tuesday, 23 August 2011

Vintage Vogue Re-issue Summer Dress - Work in Progress 2

Bound Buttonholes I fear you no more!!  

This project has been on hold for a while, partly as I needed to sew up 6 aprons and partly because I have been very scared of the bound buttonholes.  Looking at the instructions I just though argh I don't understand, so I ignored them and ran away. 

This weekend however I had a day free and I felt some sewing motivation so I started on this dress.  In my head I had started calling it 'The Impossible Dress' which is never good for conquering your fears.  The dress itself has 43 (!?!) steps in the pattern instructions which is more than any I have done before.  To break it up I have written the numbers down and am slowly crossing them off as I work through it as it is better for me to break them down into small pieces.
Front right bodice piece

I have currently done 1-11 which includes the bound buttonholes on the bodice.  Before starting on them I searched the net for tutorials and found this one on Gertie's New Blog for Better Sewing which explains it
very well.  I didn't really know what they looked like finished either so this was very helpful.  I grabbed some scrap bits of fabric and had a go myself.  I was just playing to see how it worked so it isn't pretty and I didn't press it, it was just to get the hang of it.
Buttonhole practice

So then I was feeling very confident and I re-read my instructions and realised the pattern suggested making them in a slightly different way.  Instead of using a different piece of fabric for the lips as Gertie suggests, it uses the same fabric that is pushed through the hole folded back on itself.  I decided to use this technique as it kept the bulkiness of the fabric down.  I am really pleased with how they have turned out so far.  Don't mind the black stitching, that is just to keep them in place and to stop them stretching when sewing the bodice together.
Bound buttonholes on front
I have also done the darts in the front and back and sewn the 2 front bodice pieces together and the same for the lining.  I have realised that sewing darts is one of my favourite things in making up a garment.  I think it is because they make your flat piece of fabric instantly shaped and more on its way to becoming something you can wear.
Back pieces and linings


Wednesday, 15 June 2011

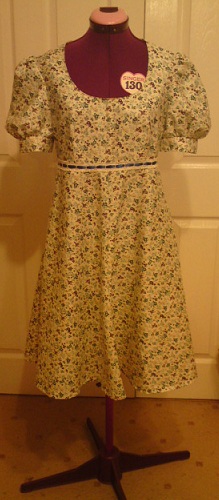
My 1975 Ditsy Floral Dress -Finished!

I have finished my dress :)  This makes me happy!  I am off camping this weekend so I knew I wouldn't have a chance to work on it so it has just been little bits here and there and I managed to hem it this morning.
Front view
The sleeves are puffier than I first thought but I like it though they are a little tight even with reducing the seam allowance.  I added the lace trim that I bought at this years Sewing for Pleasure and threaded a blue ribbon through it to make it stand out.  I think it breaks the dress up a bit and it means that I won't have to wear an uncomfortable belt with it. 
Back view
The lace is very slightly out of line on the zip but not enough to make me want to re-do it.  I added some of the spare blue ribbon at the top of the zip instead of using a hook and eye as I think the little bow is cute.
Sweet puffy sleeves
Ribbon and lace combo
I actually managed to get and ok-ish, though not smiling, picture of me in it, I'm feeling that '70's vibe!
I was going to shorten it a fair bit more as I usually like my dresses above the knee but when I tried it on before hemming I quite liked the length so I have kept it.

Thursday, 9 June 2011

My 1975 Ditsy Floral Dress -Work in progress 2

Hooray I had a day off today and actually got some more done on this dress.  I was hoping to have finished it but best laid plans and all that.  This morning I went to see an exhibition at the local college which my friend had photography work in.  They also had some dressmaking bits including a really pretty 1950's poodle skirt.  It was interesting to see what people had made from this course as I decided against it last year as it was one evening a week and by the end of the year you had only made one outfit.  I know I can make a dress in a few days so I wasn't that impressed though I did think maybe it would be a really good quality outfit and maybe there would be things I could pick up that I wouldn't  have learnt through teaching myself.  Then I looked at the inside seams of the garments.  Completely unfinished and left raw and the hem was all done on machine.  Hmm.  Glad I didn't take it now as I am not sure I would have learnt anything new.

Anyways, on to the current project, my 1975 flowery dress.  I decided to make the dress with the neck facing from the instructions as the original suggested rather then lining it as the fabric is not see-through and I don't want it to be a bulky summer dress.
Inside neck facing before pressing
I also finish all my seams with my overlocker.  It's quick and easy and I am not really that worried about retaining the vintage feel by using French seams as I use vintage patterns because I like the designs not because I want to be historically accurate. 
Pressed facing from inside dress
The pattern suggested stitching along the top of the facing but I thought top stitching might keep if folded down better so I top stitched around the neckline through the facing.
Inside of sleeves
Next I sewed up the little puff sleeves, these were quite straight forward as they were the same method as a Burda shirt I made a few years ago.  It leaves the cuffs looking all neat and pretty inside.  I had to reduce the seam allowance by half a cm on each underarm seam as they were feeling a little tight on my arms when I tried them on.  (I hope other people do this, walk around with disembodied sleeves on their arms!)  I top stitched the cuffs to match the neckline too. 
Puffy sleeves!
The pattern calls for the zip to be put in before the facing and sleeves but as I plan on adding some trim (which you can see around Ann's neck) and thought it would look better if I can hide the raw edges when putting the zip in rather than have them showing.  I don't really see why you have to put the zip in first. 

Sunday, 5 June 2011

My 1975 Ditsy Floral Dress -Work in progress

This week after finishing my inchies I moved on to this 1975 dress pattern, a Style pattern 1195, which I have been wanting to make up since my friend bought it for me about a year and a half ago.  I got this fabric which is a cotton lawn from last years Sewing For Pleasure with this pattern in mind and it has been sitting in my stash ever since. 
I am making view 1, the red polka dot one on the right, which has sweet little puffy sleeves and en empire line.  I quite like the ruffles on the other two patterns but I think for this fabric it will look better without.  I like the idea of making one in a plainer fabric with coloured ruffles though, or the other way around. 

When I opened the packet I found out that it had already been cut out.  I don't normally cut out vintage patterns but as this one already had been it was easier to do a tissue fit with it to work out if it needed alterations than the paper I usually use to trace patterns. 

If you look closely you can see where the dressmaker has altered the size of some of the pieces, though I don't think it is done in a conventional way, just chopping a bit off here and there!  She also cut the bottom off the skirt...
....but helpfully included it in the pattern packet and marked it as to whether it was the front or the back.  When fitting I decided the empire line was a little high on the bust so I added 1.5cm as I hate it when empire dresses come up too high and cut across the bust, which happens in some ready to wear dresses I have.  I also took a fair bit out of the length of the skirt, but not wanting to lose the fullness I folded the pattern over and re-drew the side seams to even it out.  I am a beginner at altering patterns but these weren't major improvements so I will see how they turn out.
Bodice Front
I have sewn the bodice together, then the skirt and the skirt to the bodice and it currently looks like this.
I had a little bit of trouble with the darts not sitting quite right but I made them a tiny bit longer and they seem better now, I think I should have sewn them with smaller stitches.  I like how it looks so far, narrow at the waist and fuller at the bottom of the skirt, it will most likely have a longish hem as it is still pretty long on me and I want it to be knee length.