Showing posts with label v2960. Show all posts

Sunday, 18 September 2011

Vintage Vogue Re-issue Summer Dress - Finished!

I want to add a 'finished at last' to this as it seems to have been a long project with multiple posts but if you are still there after reading them, now you actually get to see the final thing!

Front of dress
Back of dress
I did have one major problem with this dress when I attached the top to the skirt I realised that my buttonholes were not lined up.  In fact they were way out.  I may have had a frustrated little cry at this point as I just could not see any way past and I thought it was ruined.  The fabric must have slipped and I must have measured wrong but there we are.
Icky skirt buttonholes that don't match the top!
I couldn't re-do them without re-making that whole panel of the skirt which would mean a heck of lot of unpicking and detaching of the lining and re-sewing the pleats so in the end I decided I could chalk it up to a learning experience and find some way to go with it.  I was thinking of putting a line of buttons down the opposite side on a parallel slant which didn't look too bad when I pinned them on to try.  Sam, my boyfriend, then pointed out that it would look like a giant arrow pointing right to the lady parts. Not cool.  I considered using clear buttons to make it more noticeable but again he said that he thought they would stand out more, having two different colours on the dress.  He them suggested just leaving them as they are (without making them into actual buttonholes as I haven't slit the lining) and using poppers on the inside.  This is what I have done, and to be honest, when I have this dress on I really don't notice them that much.  Yay!
Front with successful buttons
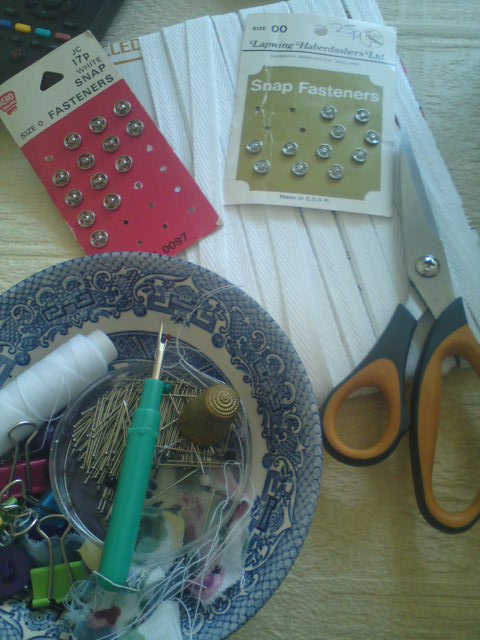
Hand stitching materials
After that it was a lot of hand sewing.  Hand sewing the lining top and bottom around the waistline, hand sewing all the facings on the buttons and buttonholes, hand sewing the lining to the bound buttonholes and hand sewing some bra snaps.  In the reviews of this pattern many people had said that it was difficult to keep it from falling off their shoulders so I used some twill tape and snaps to make a little thingy to hook it on to my bra straps.  This means it won't fall off  (hopefully) and also stops straps from showing, win win!
Bra attachment
Then it was just hemming time and there we go!  A few more gratuitous dress shots as I just love it!

The cute low back
Excuse the face, I forgot at this point that the seat here is loose and made a huge creak when I sat down!
Lastly, some picture of my lining which I think shows up the pleats better, they are hard to see in the main print.
Front

Back
How cute is this combo of tights and shoes?!  Never tried this before, I like it!
If anyone has any tips for making sure buttonholes and buttons are straight please let me know as I think I need it!

Tuesday, 6 September 2011

Vintage Vogue Re-issue Summer Dress - Work in Progress 4

Putting the top of the dress aside, I am on to the skirt of my dress.  I have never made pleats before, I have only ever sewn gathers so this is an interesting first for me.  Again I have made some modifications with the buttonhole flaps to match the top and to take into account the lining I am using.
Skirt Buttonholes
I wasn't as careful over these and it does show, though the black stitches will be removed later.  I started with the lining pleats so any mistakes I made wouldn't be obvious, stitched the sides together and then the pleats in the top.
Skirt lining pleats
I really love the look of the pleats and I was pretty pleased with them and their evenness. 
Skirt lining
The instructions on how to sew the pleats in the instructions were not very clear and I top stitched the pleats before I realised that I could have sewn it on the wrong side and hidden the stitching.  Oh well, it is a feature now! 
Skirt back
The pleats are straight really, I just pinned this onto my form while I went to work so it is not lined up properly.
Skirt Front
Ooo look at the lovely fall of that fabric!  Yay! I also love that the heavier lining fabric pushes out the skirt and gives it a nice fullness which the lighter fabric wouldn't have on its own.
Currently on my dress form...
So this is the top and bottom so far, a bit of a sneak peek!  They are not yet sewn together and the skirt lining is not even sewn to the outer skirt fabric yet.  I can see how the dress will look like overall now too.  Personally I loved the fabric when I bought it and I still love it now.  My boyfriend however said it looks like '80's curtains and asked if I would only wear it when I am not out with him.  Charming.

Thursday, 1 September 2011

Vintage Vogue Re-issue Summer Dress - Work in Progress 3

It has been a hectic week but finally I am posting last weekends progress. 
 
Back bodice
Then I sewed the bodice pieces together and the lining pieces so I had 2 versions of the bodice.  Next is wear it became a bit more complicated.  The pattern did not include a full lining so I had to make up my own instructions.  I stitched the lining around the neckline and down the sides which make up the front of the dress where the buttons close.
Inside of bodice
Well it is working so far, then came the bodging bit.  What I should have done (in hindsight) is when cutting the fabric originally I should have left off the facing section of fabric on each side of the bodice (the part folded over in the pictures.)  As I am lining it the need for the facing was removed but I didn't think about this then.  I could still have adjusted it now by cutting off the extra fabric but I quite liked the idea of the patterned fabric being on the inside so that if the dress gapes at all then you will only see fabric and not my cream lining so I have kept it.
Inside of buttonholes
I decided to keep the folded in facing which I have hemmed and I cut down the lining to prevent it for becoming too bulky.  I then hand stitched the top and side of the facing to the lining to keep it in place and to hide the stitching.  I don't mind a bit of hand stitching but I don't tend to do it on clothing so this is quite different for me and I just hope it holds.  On the opposite side I have left the facing without folding it back so that it will extend longer behind the bodice.  I am hoping this will mean that if the dress gaps open at the buttons you will just see more floral fabric rather than my bra!  I know other people have had this problem looking at pattern reviews.
Front of bodice
A lot of pressing with my trusty steam iron has helped the shape of the bodice to come through and to reduce the bulk.  It always amazes me how different a project can look with a good ironing.
Bodice Front
So this is where I have got to so far.  The pattern instructions suggest sewing the shoulder straps now but I am thinking I should wait until the skirt is attached to see where it falls and how much the weight of the skirt pulls the straps down.  The straps are slightly off the shoulder and they need to be sewn in just the right place to stop them from falling off all the time.  Hopefully I can do this.
Back bodice


Tuesday, 23 August 2011

Vintage Vogue Re-issue Summer Dress - Work in Progress 2

Bound Buttonholes I fear you no more!!  

This project has been on hold for a while, partly as I needed to sew up 6 aprons and partly because I have been very scared of the bound buttonholes.  Looking at the instructions I just though argh I don't understand, so I ignored them and ran away. 

This weekend however I had a day free and I felt some sewing motivation so I started on this dress.  In my head I had started calling it 'The Impossible Dress' which is never good for conquering your fears.  The dress itself has 43 (!?!) steps in the pattern instructions which is more than any I have done before.  To break it up I have written the numbers down and am slowly crossing them off as I work through it as it is better for me to break them down into small pieces.
Front right bodice piece

I have currently done 1-11 which includes the bound buttonholes on the bodice.  Before starting on them I searched the net for tutorials and found this one on Gertie's New Blog for Better Sewing which explains it
very well.  I didn't really know what they looked like finished either so this was very helpful.  I grabbed some scrap bits of fabric and had a go myself.  I was just playing to see how it worked so it isn't pretty and I didn't press it, it was just to get the hang of it.
Buttonhole practice

So then I was feeling very confident and I re-read my instructions and realised the pattern suggested making them in a slightly different way.  Instead of using a different piece of fabric for the lips as Gertie suggests, it uses the same fabric that is pushed through the hole folded back on itself.  I decided to use this technique as it kept the bulkiness of the fabric down.  I am really pleased with how they have turned out so far.  Don't mind the black stitching, that is just to keep them in place and to stop them stretching when sewing the bodice together.
Bound buttonholes on front
I have also done the darts in the front and back and sewn the 2 front bodice pieces together and the same for the lining.  I have realised that sewing darts is one of my favourite things in making up a garment.  I think it is because they make your flat piece of fabric instantly shaped and more on its way to becoming something you can wear.
Back pieces and linings


Sunday, 14 August 2011

Vintage Vogue Re-issue Summer Dress - Work in Progress

I started this project quite a while ago but other things have cropped up and it is not going very quickly.  Hopefully posting it on here, combined with my week off will give me a bit of a kick up the bum.  I got this lovely re-issue of a 1954 Vogue pattern in the Daily Mail giveaway last year, for just the price of the postage.  Bargain!
Vogue V2960
This pattern does scare me a bit, it has bound buttonholes which I have never done but I am going to attempt. (If they go wrong they will end up as just machined button holes, I warn you now!)  I am using the lovely floral fabric I bought at Sewing for Pleasure which is fairly see through so it is going to be fully lined.
The dress instructions do not include a lining so I am just winging that bit but I know the theory of how it should work.  I think I will line it and then add the floral facings over the top but I hope this doesn't make the top section too bulky.  I have made some changes to the pattern, but I can't entirely remember what they are!
I know I took a bit of fabric off the arm hole as these always seem to be too tight on me lately.  I *think* I took a bit off the length of the torso piece to make it sit at my waist better.
So far I have cut my fabric and lining but that is where construction ends.  I will have to gee myself up to carry on as in my mind those button holes are a bit of a hurdle.  I did get these really cute buttons in a contrasting colour to go down the front.  I figure if I am going to have buttons all down it then I want them to stand out.